Saturday 26 March 2016
Latest Website
Check out my latest blog on my website www.nsltextileart.co.uk for my latest textile work!!!
Sunday 20 May 2012
Evaluation
In
tailoring, I love the way that the manipulation of fabric is key to achieve the
smooth, sharp shape of the jacket. How it has developed over years to construct
the perfect technique of creating the jacket, the way it is drenched in history
and skill. No detailing is overlooked and the fit is key to the shape of the
wearer. Though at the same time all these things make it so hard to learn and
construct.
Over
the course of this unit my technical skills, confidence and knowledge have developed
massively, within tailoring and as a seamstress. I have learnt new practices in
the process of making the two piece suit and clarified and developed from
Defining Practice. I have also learnt new specialist skills that I hope to
develop in the future.
One
of the main new specialist skill and technique I have learnt during this
project was the pad stitching and canvassing within the jacket. I used this in
the padding of the shoulder and chest within the inside of the jacket, the
lapel and collar. Although it was hard to grasp to begin with, I feel I have
begun to master the canvas and stitch though I will need to continue to
practice in order to perfect, as this is the part of the suit I enjoyed the
most.
Looking
back at Defining practice, I feel that I have really developed further as a
tailor both in skill and confidence. My work has become a lot more accurate and
precise, as well as my understanding of methods and history of tailoring. This
came clear to me when I no longer worried about what was next and just enjoyed
the sewing, and through working aspects out for myself through research and so it
become natural. It will be hard to go back to theatrical sewing as I prefer tailoring
techniques and SA, as it makes so much more sense. I feel that I am now ready
to work independently; however, I will still need some more practice on some
parts of tailoring like the pockets, which I find practically hard.
Working
more independently has meant I have had to expand my theoretical knowledge and
problem solving as well as contextual research which in all have developed my
work and knowledge. My main resources have been The Modern Outfitter and
Clothier and The Victorian Tailor, I found The
Modern Outfitter and Clothier especially
good for pattern, historical tips and problem solving. Whereas I found The Victorian Tailor much easier to read
on history and context within Victorian/ period tailoring. They were both
useful and were key in informing the development of the unit and suit. For
example, my jacket pattern block was taken from The Modern Outfitter and
Clothier, which I drafted from.
This was much harder than patterns provide by the course and took twice as long
to understand. Though, through muddling through, I feel I really expanded my
knowledge in old pattern and in the future will be a lot more confident in
using blocks in old books. I have learnt more using these books independently,
than just being taught, making me more ready for the industry.
One of main problems was in sourcing Scottish
fabric in order to keep my suit historically accurate. I had problems in
matching my tartan with a plain wool and then with my supply, so in the end had
to cancel my order. I did however find Scottish tartan and a wool to blend with
the tartan, though they were not Mackenzie as I wanted. Nevertheless I am happy
with my fabric choice for the jacket, as it was the right type of homespun
wool, soft, flexible and loose weave, which made it easier to manipulate and
add in ease to the jacket. I did find the tartan challenging on the trousers in
matching the pattern, though I am glad I chose the fabric. Although this has
made my suit less historically accurate, I have constructed to a Victorian
method, sizes and cut, as well as using stag horn buttons.
This
project has been the first in planning and organizing independently, which I
have preferred having control over, as I can be more organized within the project
and reach my own aims and keep to schedules. All in all it has made me more independent
ready for next year.
Overall
I happy with my suit and am very grateful to Graham for passing on his
knowledge, this unit has been my favourite from all the years and I can’t wait
to start tailoring again.
Suit on Model


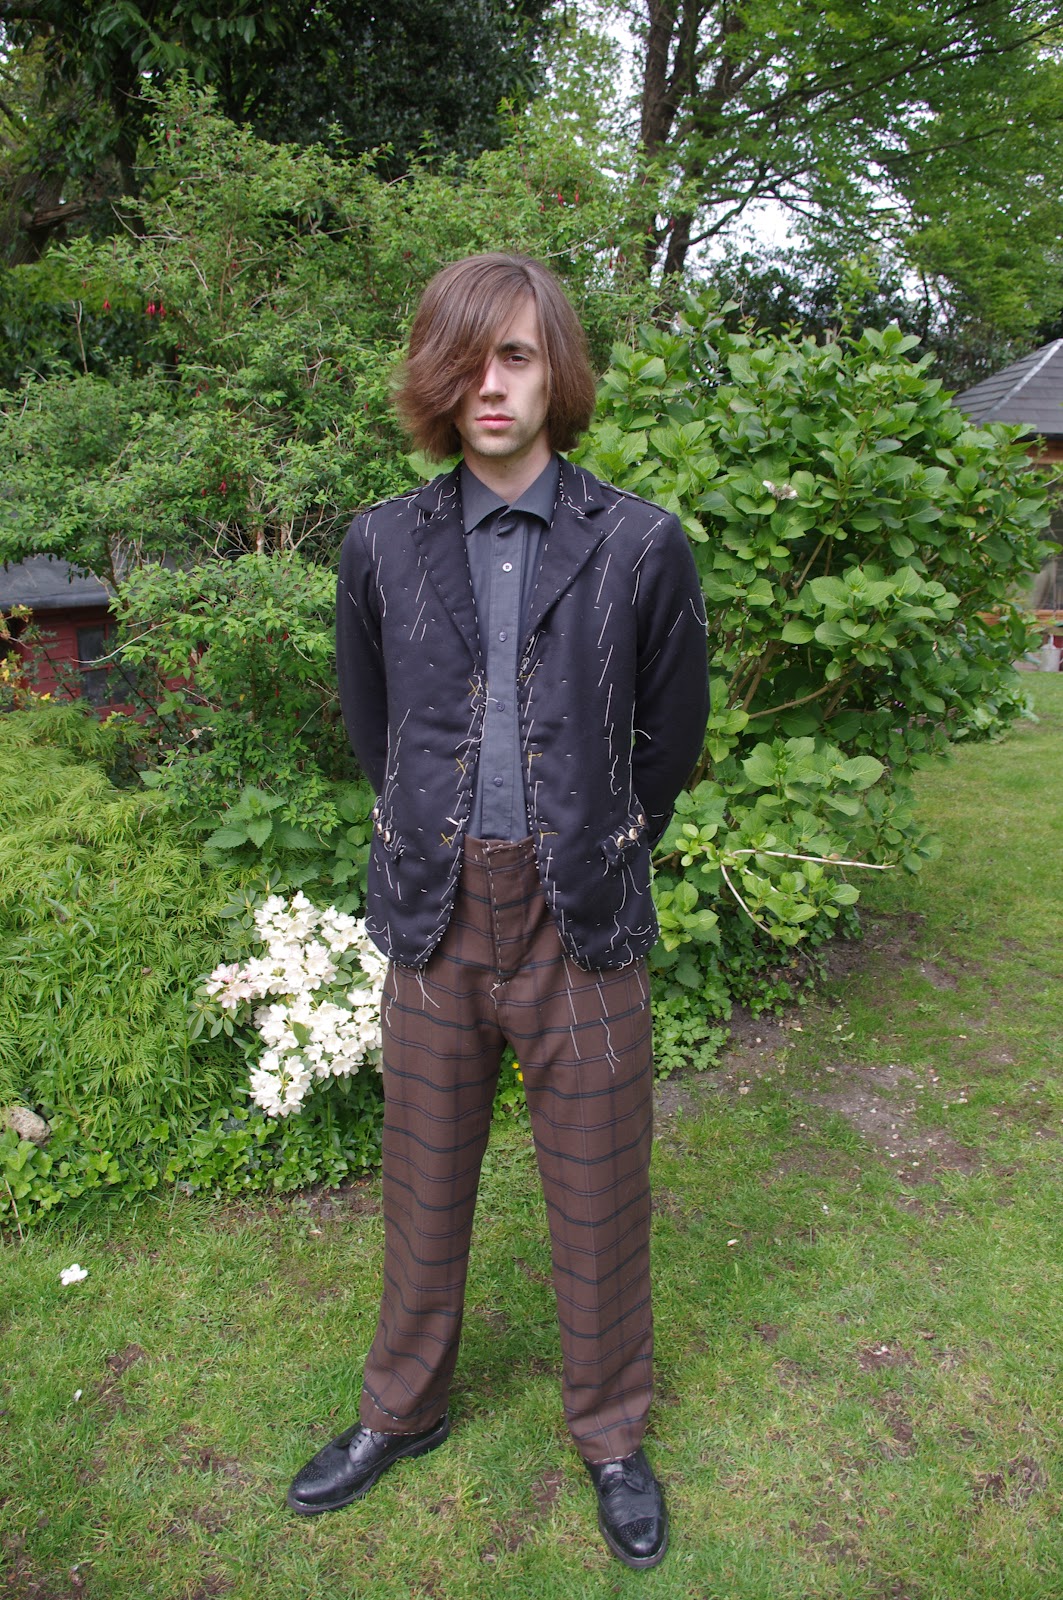


I am really happy with the fit of the jacket and trousers and its overall look, it definitely looks Scottish. You can see the historical cut, fitting and sewing as well the overall look within the two piece suit. It will fit better when the jacket buttons are sewn on as at the moment it is just pined together at the CF line.
I am happy with the trouser length and the way they sit on the shoe at the back and front. As well as the matching of the tartan as you can see the pattern flow around the body.
I am pleased with the way the lapel and collar sits on the jacket and was surprised to see how much of a difference the canvas and padding adds to the smooth shaping over the shoulder and chest area of the jacket, which has worked well. I also think the buttons add to the historical aspect of the costume.
The side slits are still a little bulky, even though I cut down the inside SA and laid it flat. In future, I will include the side silts on the jacket pattern reducing the bulk in seams.
The side slits are still a little bulky, even though I cut down the inside SA and laid it flat. In future, I will include the side silts on the jacket pattern reducing the bulk in seams.
I still think however that the pocket flap needs to be a little larger in length to be in proportion with the rest of the jacket and the sleeves need to be a little longer. This would have been noticed earlier in a fitting if I had, had one.
It will be good to take out all the basting thread and see what it really looks like!
Saturday 19 May 2012
Button Holes and Buttons
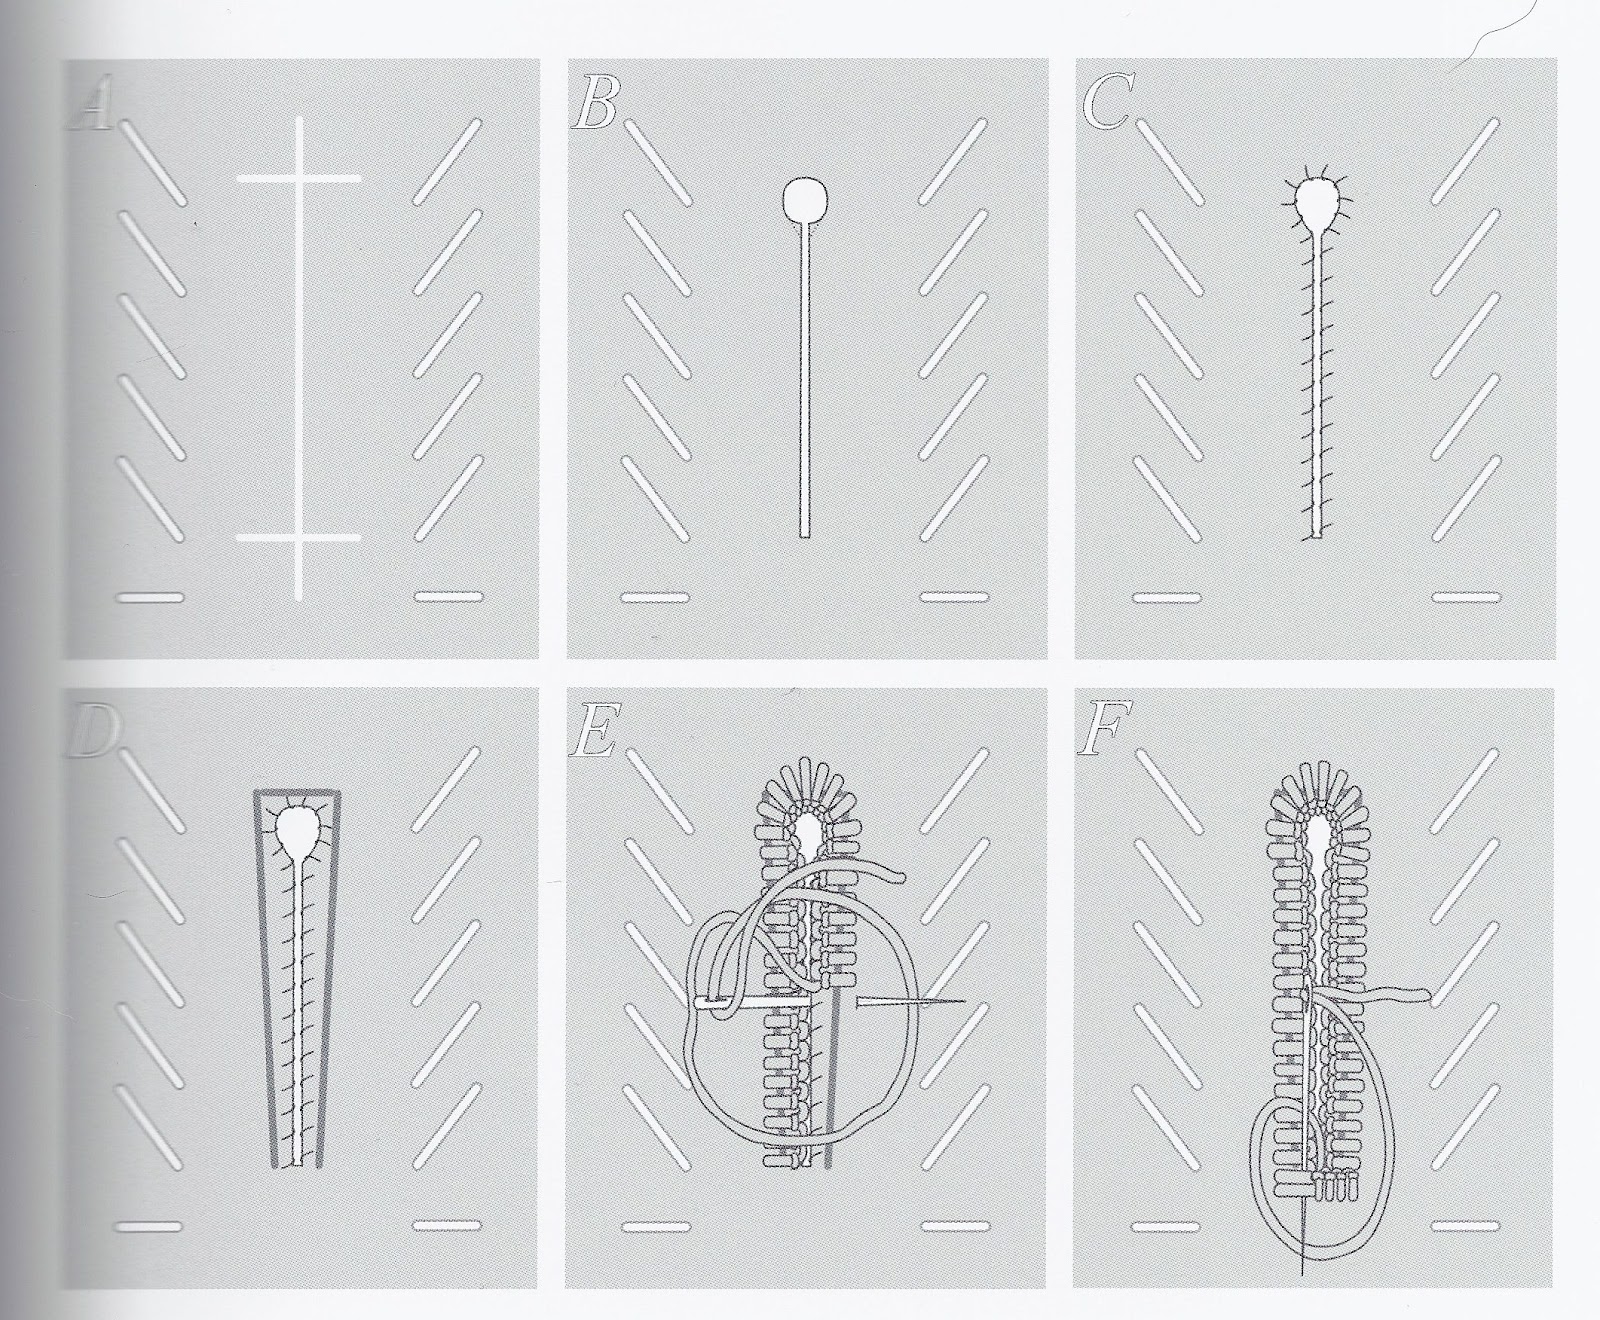
I have already done machine button hole on my trousers, which I am really happy with, due to their even spacing, length and straightness. As a group we are not going to have time to do button holes on the jacket, I could do this independently, having done button holes before, though I want to learn the tailors way so will leave them until after hand in. I have done some research however into hand button hole like they would have used in Victorian times by hand shown below:
I have however sewn on my buttons on my trousers, cuffs, pockets and shoulder strap. For my cuffs and pockets I started by sewing down my braid.


 To start with I was unsure about the stag horn buttons, I thought a plainer navy blue button would look better. But as they are historically correct for the style of suit, and because of the McKenzie link, I went a head and added them all the same. I am now glad I did as I think they add to the over look and give it more of a historical Scottish feel.


Tailor Stitches
To get a better understanding on the stitches used in tailoring and so I can improve them in the future I have done some research in to the stitches.From reading the three different felling stitches, I determined that I was sewing the third way. To get more of an angle I will need to change the position of the needle, though I will try the other two ways in the future to see if this makes any difference.


The cross stitch instructions is useful and I will try to achieve an more even stitch in the future.
Shaped Trouser Hems
From the trouser hem the seam should get bigger not following the seam on the trouser. I unpicked this to expand the seam giving me extra fabric to turn up.
In the center of the front of the trouser turn up 1.25cm and curve out. At the back turn down 1.25cm and curve back. Tack the line.


Then at the front of the trouser make a pleat in the middle and let this run out to nothing . Tack. Then cross stitch the top of the hem folded up, then the pleat.Tape can be added to around the peat of the trouser hem to stop wear, though as I have only made these trousers to learn the skills and techniques, I have not added the tape.

I had some issues with the hem, not the turning up though with the hand sewing. I used double thread to do the hand sewing of the cross stitch, I then ironed the hem. Unfortunately because my trouser fabric isn't very thick small pin pricks could be seen on the right side of the trouser. So I unpicked by sewing and sewed it in single thread. It came out a lot neater on the right side. Though where I ironed it before, a line can still be seen. I have learned from this not to iron to heavily on the sewing line of the hem, just the bottom of the trouser.Other than this I am happy with my trousers.
Friday 18 May 2012
Finishing the Collar

After pinning on the collar on the stand, fell stitch the bottom stand line to top fabric of the jacket from the collar step to collar step.
 Then place the jacket on a stand and check. If all is ok, determine the length of the collar and cut. (I found that is normally were the step is on the made in the collar) Angle depending on research. Do this for both sides.
Then place the top piece of cloth with the right side facing you on top of the canvas, matching the stand line. Tack through this line. Then baste the fall and tack at the bottom of the stand in to the top cloth not the lining/ facing.

Then flip the jacket over to the Melton side of the collar. Trim away any excess top cloth to 0.5cm on the top of the fall. (I found though if your fabric frays a lot leave 0.75cm.) Then fold the top fabric into the middle of the canvas and Melton along the top fall line, laying the Melton on top of the cloth. Pin all the way along and then fell stitch.


Once this is done all the way along iron the collar with stem, not pressing down with a ham, to achieve the shape of the collar when folded over on the stand/ fall and to shape the canvas. then check this on the stand.
At the bottom of the stand where its attached to the neckline. From the step in the collar to the end of the cloth facing fold the collar in on itself (the top cloth only) and pin. (you may need to undo the bottom tack lines). Then on the facing of the jacket fold the SA in on itself like the collar. These should meet each, butted up, pin and tack on both side. Then use stoating stitch attach together. (this stitch is just weaving the needle in and of the two folds in the middle, so not seen, sewing them together.)


 Then fold two end of the collar top cloth over on to the Melton. The two side edges are folded and the end is left raw. This is the cross stitched down.
Once this is done on both sides, fold the lining of the jacket over the top of the collar and slip stitch down. Press and check on the stand.

I am really happy with my collar, it so nice to see the jacket come together. I was slightly worried that the collar would be wider than the lapel though has ended up the following the line smoothly around the neck ,and looks just like the lapel and collar in chosen image and historical research.
I expected the collar to be a lot harder that it was, though way surprised how easy it was. Maybe this is because though the projected by tailoring skills has developed, as well as my technique skills.
However I think I can improve on my felling stitch as it needs to be more angled historically, though through practice and I think I can improve this.
I like the clean finish of the lapel and collar as it looks like it was machined and was surprised that the collar is completely hand sewn on. I am also happy that my collar finish as the correct point on the shoulder strap.
I love the way the canvas is so manipulable and if I learned nothing else, but just canvas and pad stitching I would be happy with the project. I like the way you can create gentle, graceful curves and fixed shape and being able to change the firmness of the collar, inside canvas and lapel by the stitching and attaching.
I love the way the canvas is so manipulable and if I learned nothing else, but just canvas and pad stitching I would be happy with the project. I like the way you can create gentle, graceful curves and fixed shape and being able to change the firmness of the collar, inside canvas and lapel by the stitching and attaching.
Overall I am very pleased with my collar, though I could do it better a second time. It is a skill and technique that I will definitely use in the future, and is the best way to make a collar I have done.
Subscribe to:
Posts (Atom)